Thursday, August 23, 2012

3D origami crocodile/ a little story

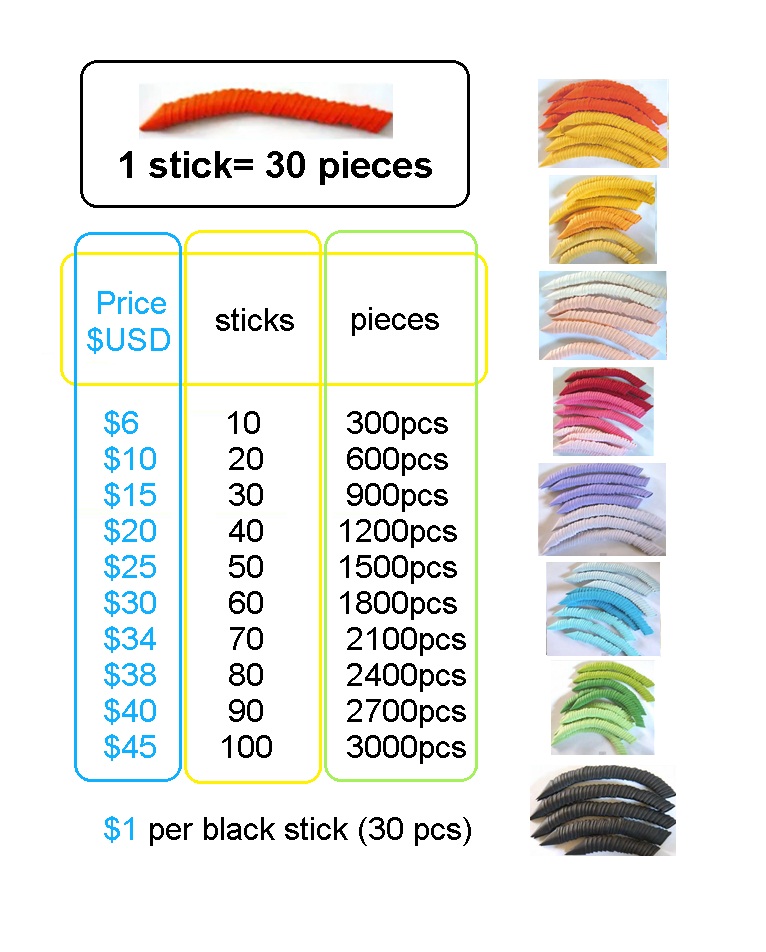
(3D origami crocodile. Diagram below.) 
Also some little meaningful words below. It would be nice if you read it all :-) Thanks^_^
  ~ ~ ~ ~ ~ ~ ~ ~ ~ ~ ~

One of my subscribers emailed and requested a 3D origami crocodile (Just to look at which she'll figure out how to make on her own). I was gonna say I didnt have time as I had uni assignments to do, but she mentioned it was for a nephew. 

"This alligator or crocodile is for my nephew,6, who is a huge reptile lover, but is fighting for his life battling lung cancer. I just thought it would be nice to give him something to brighten his day."

Since I haven't done many 3D origami tutorials for ages and have been saying "I'm busy with uni" to a lot of people's requests, I thought I should do this one and make a difference to someone's day, and I did have time at that moment to make a quick small model during my 1 week holiday. 


She's 13 and I thought it was mature and nice of her to think of making something for her nephew to brighten his day. I recently read a book called "The healing power of water by  Masaru Emoto" and when I got this email, it felt like they linked? (You know, when you read a book and it mentions a word you don't know, or a situation, and then later that word comes up or a similar situation happens.) 

In the book it mentions how positive words were stuck onto, and facing inside a bottle of water, and negative words on another (same type of water). He froze them and took a photo of the water crystals as you never get the same crystals. The one that "saw" positive words, formed pretty crystals, and the ones with negative words had half formed crystals and looked broken and ugly. Its about positive and negative vibrations and their effects. Apparently thoughts have vibrations, and when we hear positive/negative words, it gives a different effect/feeling.

What's also interesting is that humans are made up of  around 60%? water and they say if words can do that to a bottle of water, imagine what it can do to us? Which explains how positive thinking works and how hurtful words/ negative self-talk can affect people. Anyway, they also tried the experiment with homemade food and takeout. The homemade food had high levels of 'hado' ( vibrations I think? yeah I think they had something to measure hado) compared to fastfood which is made in a rush/ with no care. When the person made the same homemade food but with bad thoughts (like "ugh why should I make this, I don't have time!!!"), it also had lower levels of hado. Recently my mum's friend came over and saw my mum making us lunch. She said (in diojiu) "Making food for your kids is good. They'll eat your love" which is mainly like putting effort/care into making something for someone, and they'll receive your love/ thoughtfulness.

This made me think about handmade gifts. They're special because the person made it especially for you, you can't get it anywhere else as they made it. It's one of a kind and made with love. Especially when its your favourite colour, favourite animal etc.. when someone makes you a specific thing cos they know you like it, you know they thought of you when they made it. 

So I thought this person wanting to make a crocodile for her reptile-lover nephew was sweet and thoughtful. And since he's sick, a handmade gift would be the perfect thing for sending positive energy to him.

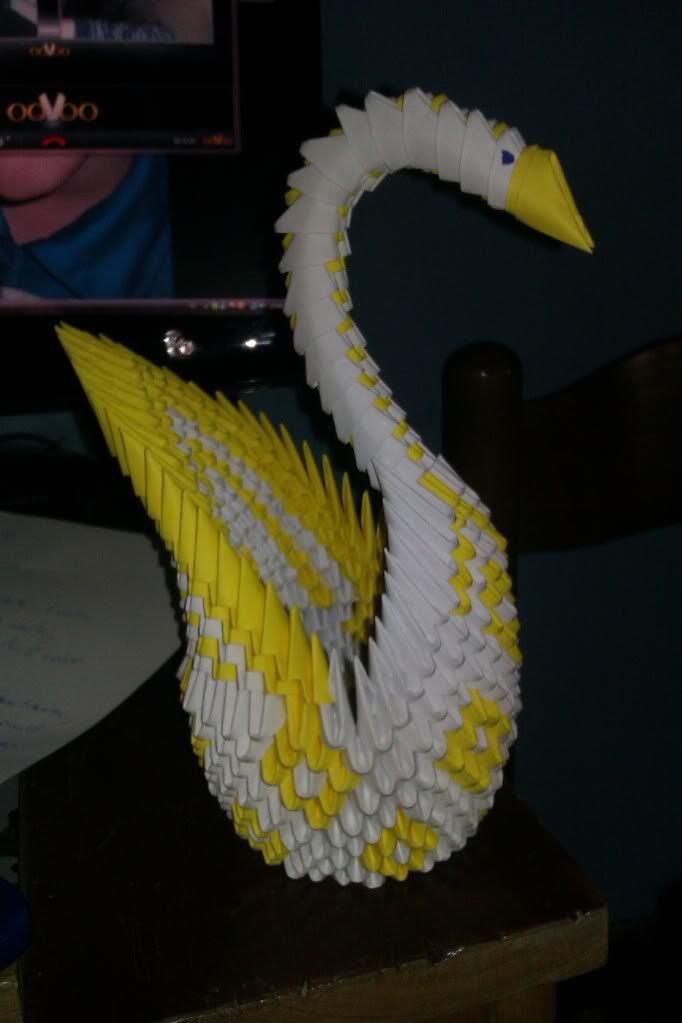
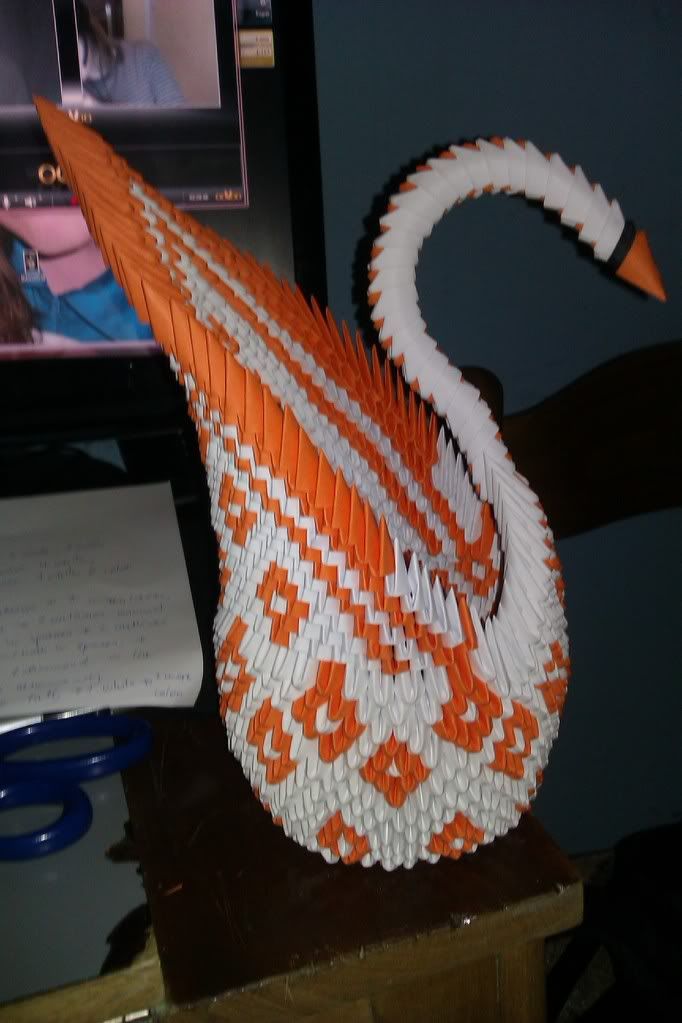
So those are some photos above, and a diagram below. I know it doesn't look that great, it's just the same structure as most of my small models, but showing the technique of how to make a mouth stick out (2 mouth pieces made separately and pushed in the head & glued). It might look more crocodile-ish with a dark green, and maybe a brighter yellow if you like. It might look good with google eyes, I dunno. And some small yellow triangles could be inserted in the middle back for the spine/spikes thing (use half the size of the normal triangles)

-The eyes are made like the ears of the 'green pig' tutorial ( at 2.14 in this video http://www.youtube.com/watch?v=MMb7DwJyBsA) (sorry you have to see my thumbnails close up which were shit at the time. Was pressing too hard with my thumbs on something and they got thick & gross. Had to just wait to grow them out)
and the arms/legs are made like most of the other small models.


Diagram:

I'm into reading about "the secret/law of attraction", positive thinking, energy and all that stuff,  and I read about how telling people your goals and stuff helps it happen. Since they're thinking about it too, then its like a combination of thoughts put out there which attracts more of the same thing ("throw something out there and it comes back to you"). If more people are thinking about it, the thought/vibration is more stronger. So I thought I'd mention the nephew in this post to add more meaning to it, rather than just uploading the pics/ diagram, so that maybe when you guys read about, it would help send positive energy to him :-) 

I know I'm into all these weird theories and stuff which people are sceptic about, and I know they're exaggerated for movies and books, but I've had my experiences with positive thinking, so I know they work in little ways. All the best to that nephew and anyone else out  there who's sick, or feeling down. Get well soon!^_^

Make a handmade gift for someone to brighten their day!!^_^

Sunday, June 24, 2012

some of my uni work- growing & developing my art style

Hey guys, sorry I haven't made tutorials in ages. Been busy with uni, and thought I'd have time in the holidays, but then I was given holiday assignments! 

Anyway, I've uploaded some pics here to give you guys some new stuff to look at. Just thought I'd share some of my work from my last assignment, since there's some crochet in there.

~ ~ ~ ~ ~ ~ ~ ~ ~ ~ ~ ~
I developed an idea of a "cute soup" which I really like, and I don't think its an idea that's been done much before. It finally feels like something that's mine, more original, different to the cute animals I always make that pretty much look the similar to things that have been done before

(In the soup is a house, 2 cakes, an oreo cookie, and a cupcake)


The "Cute soup" was developed from a phrase "My favourite recipe" (We were given a list of phrases, had to pick 3, and develop artwork from them). So my idea was putting some of my favourite things (the cute/kawaii look, zakka style, homemade/ handicraft stuff) in a bowl of soup, making a recipe of favourite things, hence "My favourite recipe".

My tutors analysis of it was so much deeper lol. She said it was something that would get criticism from people because handicrafts is associated with the domestic and feminine, and considered inferior to 'high art' like painting, and that only men were artists back then, while women did crafts at home which was applied arts/ low art.
She said my work was a disruption of the art conventions and a statement that handicrafts is just as important and valid as an art form.

A class mate said it looked like an ideal soup for a kid that doesn't like eating vegetables, and just likes to eat sweet things^_^


I didnt know about crafts being inferior for being associated with the domestic and feminine. It gave me something to research and I realized there actually is more behind artwork. I used to think people bullshit about artworks and make up reasons/meanings but you can actually come up with honest issues/ideas and develop artwork from them.

I initially was gonna present it on a pedestal as a sculpture (the bowl of soup, and the plate of cute food) but the tutor suggested pinning it to the wall, which makes it more like a painting/ work of art, and makes a stronger statement.


 I also developed the cute soup into a painting (yeah I know its amateur^_^ I just like the idea of it. Hope I can get better soon and develop it into a better piece of work ). The chinese bowl and soup spoon add a bit of culture into it as well. 

The bubbles flying up were influenced by Alex Mcleod's work. I stitched patches of patterned fabric on them to add a crafty look to it. Its kinda like steam coming off the soup, and a smell/ aura of creativity I guess? lol. What does it look like to you? My tutor thought it was icecream scoops.

To me, the cute soup  work is a compilation of: handicrafts, that zakka/ homemade style (soup seems homey/ cozy/ domestic to me, something your mum makes you when you're sick, or something you drink on a cold lazy day), a bit of asian-ness, like the bowl and soup spoon, and also the kawaii things in there (house, mushroom, bear/bunny clouds). 

Doing art/design at uni has helped me explore more ideas, grow and develop my art style. I remember I started teaching crafts on youtube cos I wanted to teach how to make cool crafts, cos all the ones I saw on craft shows on TV were crappy lol. I wanted to show that crafts and handmade gifts weren't cheap and ugly. They were thoughtful, meaningful, and could actually look cool and be well-made as well, and be better than bought gifts.

After the tutor said that my work was a statement that crafts is just as valid and important, it was like she was bringing forward things at the back of my mind. When family friends saw my crafts displayed in the lounge and heard that people were ordering them, they said "does it even make that much money?!" in a jealous tone. Continuing to do crafts feels like resisting the criticism of other people. 

Criticism as in the typical "art doesn't money". And from my mums 'friends' saying I was wasting my time teaching on youtube and that selling crafts doesnt make that much. Then I slowly got more successful overtime and they gave bitter looks when I got bulk orders and bigger commissions. I could tell they were jealous inside cos some of my commissions made more than their tray of bakery food. They would react by saying people are stupid to buy that (when they were selling overpriced cans of fizzy drinks. Aren't people stupid to buy that? hypcrites..).

Anyway, I feel like my work is resisting what people say about art/crafts, and its proof of me still sticking to it and doing it despite what they say. To anyone out there that has a passion, hobby, thing that they do, whether its music, writing, art, etc... that people are against for whatever reason, I hope you still continue on with it whenever you can, even on the side, and not let people take it away from you. 


(The other 2 paintings of the people holding their arms up were from the phrase 'When I won'. They're just meant to be like those inspirational/ uplifting pictures. I went to those entrepreneurial 'how to be a millionaire/ how to be successful' seminars and this guy said "You have to saw it before you see it" (playing with past and present tense there)
He told a story of a guy who had plans for an amusement park (I think it was Disney land?). He drew/planned it all out, died before it was finished (His workers carried on building it), and someone said it was a shame he did't get to see it. Then his wife said no, he did see it, he saw it before all of us.

So the phrase "When I won" didn't make me think of when I won something in the past, but
when I WIN, when I get to where I want to be. With won replacing win, as if you have already won. Its like a vision of how you want to feel when you get there (I'm into the whole positive thinking/ visualization thing and 'The secret'/ "Law of attraction"- look it up if you dont know :-) 

So those are some of my works from my last assignment. I hope I can get better at painting someday so I can actually get out my thoughts accurately. Those paintings of the people holding their arms out dont look as inspirational as I wanted them to be. It sucks when you have a good idea but cant accurately express it lol. Anyway, I'll add some more pics of my other assignments later.


Saturday, May 12, 2012

big 3D origami bear with 3D limbs


This is the bear I made for a 21st birthday present. 

I now have a video tutorial for the teddy bear! Tutorial hereBUT I havent shown how to make the ears or attach the limbs so you'll still have to look at the diagram and read the written instructions.

Heres the diagram, and extra notes/instructions on making it. Enjoy~ :-)

(diagram in blue and orange so you can see it better. Make them any colour you want)
LAST 3 ROWS of head:

row 17: [2 decreases, 2 normal] all the way around until you get to the end, there will only be space for 2 more decreases. so there will be 4 decreased pieces next to each other at the end. Start & end wherever you want. Preferably near the back of the head so you don't see the odd decreasing at the end.

row 18: Decrease all around. At the end there will only be room for 1 normal piece (going over 2 points)

row 19(last row): normal row. Each piece goes over 2 points
~~~~~~~~~~
EARS
make a 'stick' of 20 MINI pieces. So the pieces are made from half the size of the rectangle you used to make the head. Stack the pieces into a stick and bend/curve it. Snip slits along the bottom of the pieces, underneath the curve (NOT the bump of the pieces, which are on the top)

gluing ears- I think I put an inverted piece at the bottom part of the ear, so that it sticks into the head better (didnt include that in the diagram). figure out where you want to put the ear (no specific place), find a hole in the bear head, for the top and bottom points of the ears to fit into. glue in place

GLUING AMS & LEGS
Do your best to try and match the points of the legs to the holes of the body. It wont fit perfectly. (not every point of the legs can go into a hole). Once most of the points are aligned to a hole in the body, kind of shove it in/ push it in deeper to open the holes of the body a bit. 

Then take the leg out but remember how you fit it into the body/where the points go. Put PVA glue (the white glue that dries clear. There are other names too: wood glue, craft glue etc..) on the top of the legs where the points are, shove it back into the body, hold it until it dries (maybe for 30secs to a minute?)

ARMS- for the arms I just squeezed hot glue on the top part on the inside of the arm and stuck it to the body. Since its a flat panel it's easier. You can probably use PVA glue too. You may still have to hold the arm for a while for the glue to dry
---

Saturday, April 21, 2012

New 3D origami graduation bears + diagram

I recently got a request from a friend for graduation bears with coloured hoods (to match the degrees). She'll be giving them to her graduating friends which will be a cool gift since they're personalized, compared to a bought graduation teddy (which makes handmade gifts AWESOME since you can customize them^_^). 

These bears are slightly better than the old ones I made, there's no increasing on the mouth. I've made a new DIAGRAM  for you guys (at the bottom of the page).
(I'll add a link to a tutorial when I make one) 

-To make guy and girl bears, the girls have pink cheeks and different ears, while the guys don't have pink cheeks, and have rounded ears. 
-The colours of the tassels also make them more guy-ish/ girly (pink & yellow for girls, blue for guys)
-And 2 other special requests were to make a gangsta bear and a pedobear^_^
-And again, my fav part is that the hoods match the colour of the degrees^_^ LOVE personalized gifts!

Here's a vid of the bears, and some photos as well

Scroll down to the bottom for a diagram. (I'll add a link to a tutorial when I make one)


Special requests: Pedobear & gangsta bear


Refer to the old graduation bear page as it shows how to make the hat

Sunday, April 15, 2012

gift idea for 21st birthday present

Just wanted to share my recent handicraft works, which were for a 21st birthday present.
(Maybe this can give you some ideas for bday presents too! ^_^)

-Foam rose bouquet  (Foam rose tutorial here:  youtube.com/watch?v=q_l7Vu13wRU)
with amigurumi rabbit (holding a golden 21 key!)
-3D origami cake
-Some origami flowers in the box for decoration. Tutorial: youtube.com/watch?v=guX77GmWFr4


Thursday, April 5, 2012

3D origami diagram~ Graduation bears

I made these for these twin sisters that were graduating (Hence there are 2 of the same Graduation bears^_^)

Heres a diagram of them. I haven't had time to draw how to make the tassel yet, (you can just google it for now) but I'll upload the tassel instructions on here when I've drawn them.


This is a cute gift for friends/ family graduating. You can change the colour of the tassels to match the schools colours or colours of the degrees, and even the colour of the bears as well to match their fav colour. Maybe even add a scroll  to the bear's hand if you like^_^


(Sorry, the writing's hard to read, CLICK the pics to enlarge)


Enjoy~^_^
-------------------------
PIECES


103 dark yellow
85 black
10 light peach
2 light pink


Monday, March 26, 2012

Buying 3D origami sticks


Buying 3D origami "sticks"
vid: http://www.youtube.com/watch?v=igzqfg-nw48 

The PIECES to make these paper sculptures


~Sticks (30 pieces) are priced in $USD. Postage is in $NZD (which is cheaper in $USD & most currencies)
~Payment: Paypal ONLY
~Shipping: worldwide  *Please read the note at the bottom of the page*

Read below for all info on buying
-Prices of groups of sticks
-Colours 
-Order template
-Postage info & postage price estimation


ORDER INFO
Send your order by email or message me on Youtube
~Email: jewelliaproducts@gmail.com
~Youtube channel: youtube.com/jewellia7777
_________________________________________________________
 Example of order

Hi

I want to buy 40 sticks ($20)         number of sticks you want ($__ price)
10 dark red                                    
10 yellow                                           list sticks of colours
5 bright yellow                                  so that they add up to the 
5 sky blue                                         number of sticks you want 
5 dark blue
2 light green
3 light pink

and 5 black ($5)                       black priced separately ($1 per stick)

TOTAL $25                                                            TOTAL

My paypal email is bob123@hotmail.com         include your paypal email
I live in america                                                      and country

Thanks
_____________________________________________________________
POSTAGE INFO
~I send worldwide given that you give me a correct/valid address.
~I send mostly to America. Sometimes Canada, England and Australia
( Sending to Australia is cheaper since it's closer to NewZealand^_^ (I live in NZ) )
~I've also sent to (once or a few times) Netherlands, France, Brazil, Austria, South Africa, Belgium, India, Bermuda, Saudi arabia, Cyprus & Singapore

Below is a list to give you an idea of postage prices. (Postage depends on weight of package)

Minimum postage is $11.50NZD which is around $9.63USD (conversion rate changes everyday), for up to 200 grams (weight of package) which is about 10-30 sticks. 

So it's better to get at least 20-30 sticks because some people buy 10 sticks and the postage is more than the sticks and not really worth it.

The more the package weighs, it goes up by a couple of dollars
 up to 200g = 12.94NZD/ $10.67USD (10-30 sticks)
250g = 14.14NZD/ $11.65USD (40 sticks)
300g = 15.34NZD/ $12.64USD
350g = 16.55NZD/ $13.64USD
400g = 17.75NZD/ $14.63USD
450g = 18.96NZD/ $15.63USD
500g = 20.16NZD/ $16.62USD
550g = 21.36NZD/ $17.60USD (100 sticks)
...etc

It may be a bit more expensive to certain countries. But the main countries I send to (america, canada, england...) are the prices above
----------------------------------------


Disclaimer: Parcels from New Zealand to overseas do not have a tracking number (Unless you choose that option, but it's expensive, over $80) therefore I can not do anything if a package is not received, which rarely happens. 

You must provide a valid/ correct address and let me know if your address is different to the one on the Paypal account.

I am not responsible for the package once it is sent. I will give a refund (for the sticks only) if the package is sent back to me.

4-10 working days (not counting weekends or public holidays) is the target amount of days it takes to get there. In a few cases it has taken a month even with the target of 4-10 days.


Sunday, March 11, 2012

bigger diamond pattern swan


Hey people! If you want to make a bigger diamond pattern swan, here are some written instructions sent in by spelcika1990 on Youtube:


(If you haven't seed the video for the normal sized diamond pattern swan, watch it here: http://www.youtube.com/watch?v=GWEbFTdPhpk)

 spelcika1990's instructions:
Normal sized swan & Bigger swan


PIECES
770 white pieces (+48 for the neck)
494 colored pieces (+23 for the neck)
1 black

1. Start with 9 white 'mountains' (4,3,2,1) and 9 diamonds.  (as shown in the normal sized swan vid linked above)
2. Outline the diamonds 3 times
3. Add another row of diamonds
4. Outline the diamonds 1 time
5. Add another row of diamonds

CHEST:
6. 2 white outlines on 2 diamonds
7. between 2 outlines (between the mountains) make a diamond
8. Around the diamond make 1 white outline
9. Add color outline
10. And add another white outline until the last colored piece (leave it for the neck)
11. Fill out the spaces between the diamonds with white

TAIL (inverted)
12. On top of the last diamond color piece put 2 color pieces
13. Continue with 1 white, 1 color, 4 white, 1 color, 4 white, 1 color, 4 white, 1 color, 4 white, 1 color, 4 white, 1 color, 1 white, 2 color pieces
14. At 4 white pieces build up mountains - you end up with 5 mountains
15. Between mountain spaces add diamonds - you end up with 4 diamonds
16. Make 2 outlines around all 4 diamonds
17. Between mountain spaces add 3 diamonds
18. Outline 3 diamonds twice
19. Between mountiain spaces add 2 diamonds
20. Outline 2 diamonds twice
21. Now you can make the last diamond and make 1 outline around that diamond
21. Now outline the whole tail with color pieces
22. Next outline is white
23. Finish with 2 color outlines around the whole tail.

NECK
I'm sure I don't need to have to explain you, it's the same, I used 48 white pieces and 23 colored pieces.

I added another black piece to make it realistic and another orange at the end.


Thursday, February 16, 2012

kawaii rabbit plush pattern

Here's a basic pattern for a kawaii rabbit plush. ~Enjoy ^_^

(Click on the image to see the measurements more clearly)

Video tutorial on just the head here:

NOTES:
-The measurements are there as a guide so you can draw the shapes the same size as mine, but you can make it any size. They're simple shapes to draw so you can roughly copy this, and it doesn't matter if it's a little bit different. 

-You can modify it to be another animal. Change the shape and position of ears to make a monkey, bear etc...

-Cut the head &; body shapes (2 each, front & back) with a SEAM ALLOWANCE (GAP around the outline) because you will sew around and turn inside out later on.

- The shapes in the blue box (on the right side) don't need a seam allowance cos you'll sew them straight onto the plushie. There's no turning inside out or anything.

-The green lines at the neck of the head & body shapes show that you leave a gap there when sewing so you can turn it inside out later.